🎯 Learning Goals
🎯 Learning Goals
- Implement wireframes into a UI
- Create navigation controllers and segues
Getting Started
- On your laptop, find the Xcode application by typing
cmd + space, typing inxcode, then press return - Click
Create a new Xcode project - Under
Choose a template for your new project, selectiOSandApp - Click the blue
Nextbutton in the bottom right corner - ❗️You must check the
Use Core Databox!❗️ - You will be prompted to save this file. For
Product Name, type in whatever name your want to officially title your app, then click the blueCreatebutton in the bottom right corner. - NOTE: This will be your ACTUAL project! From now on, you won’t really be creating new projects, just opening this one up and working from wherever you left off.
- From the top menu, select
Source ControlthenNew Git Repositories. ClickCreateon the pop up.
What we’re building
This is a really cool ToDo List application that has never been built before 🙄😛🤗. You can create a new ToDo, indicate if it is important, and delete it from your list once you have completed it. Genius!

Setup
-
Head over to
Main.storyboardand delete the existing View Controller -
From the Navigation Pane, delete the
ViewController.swiftfile associated with that View Controller (Move to Trash) -
From the Object Library, add a
Table View Controllerto the Storyboard -
With the
Table View Controllerselected in the Storyboard, embed it in aNavigation Controller(select this option from Editor)
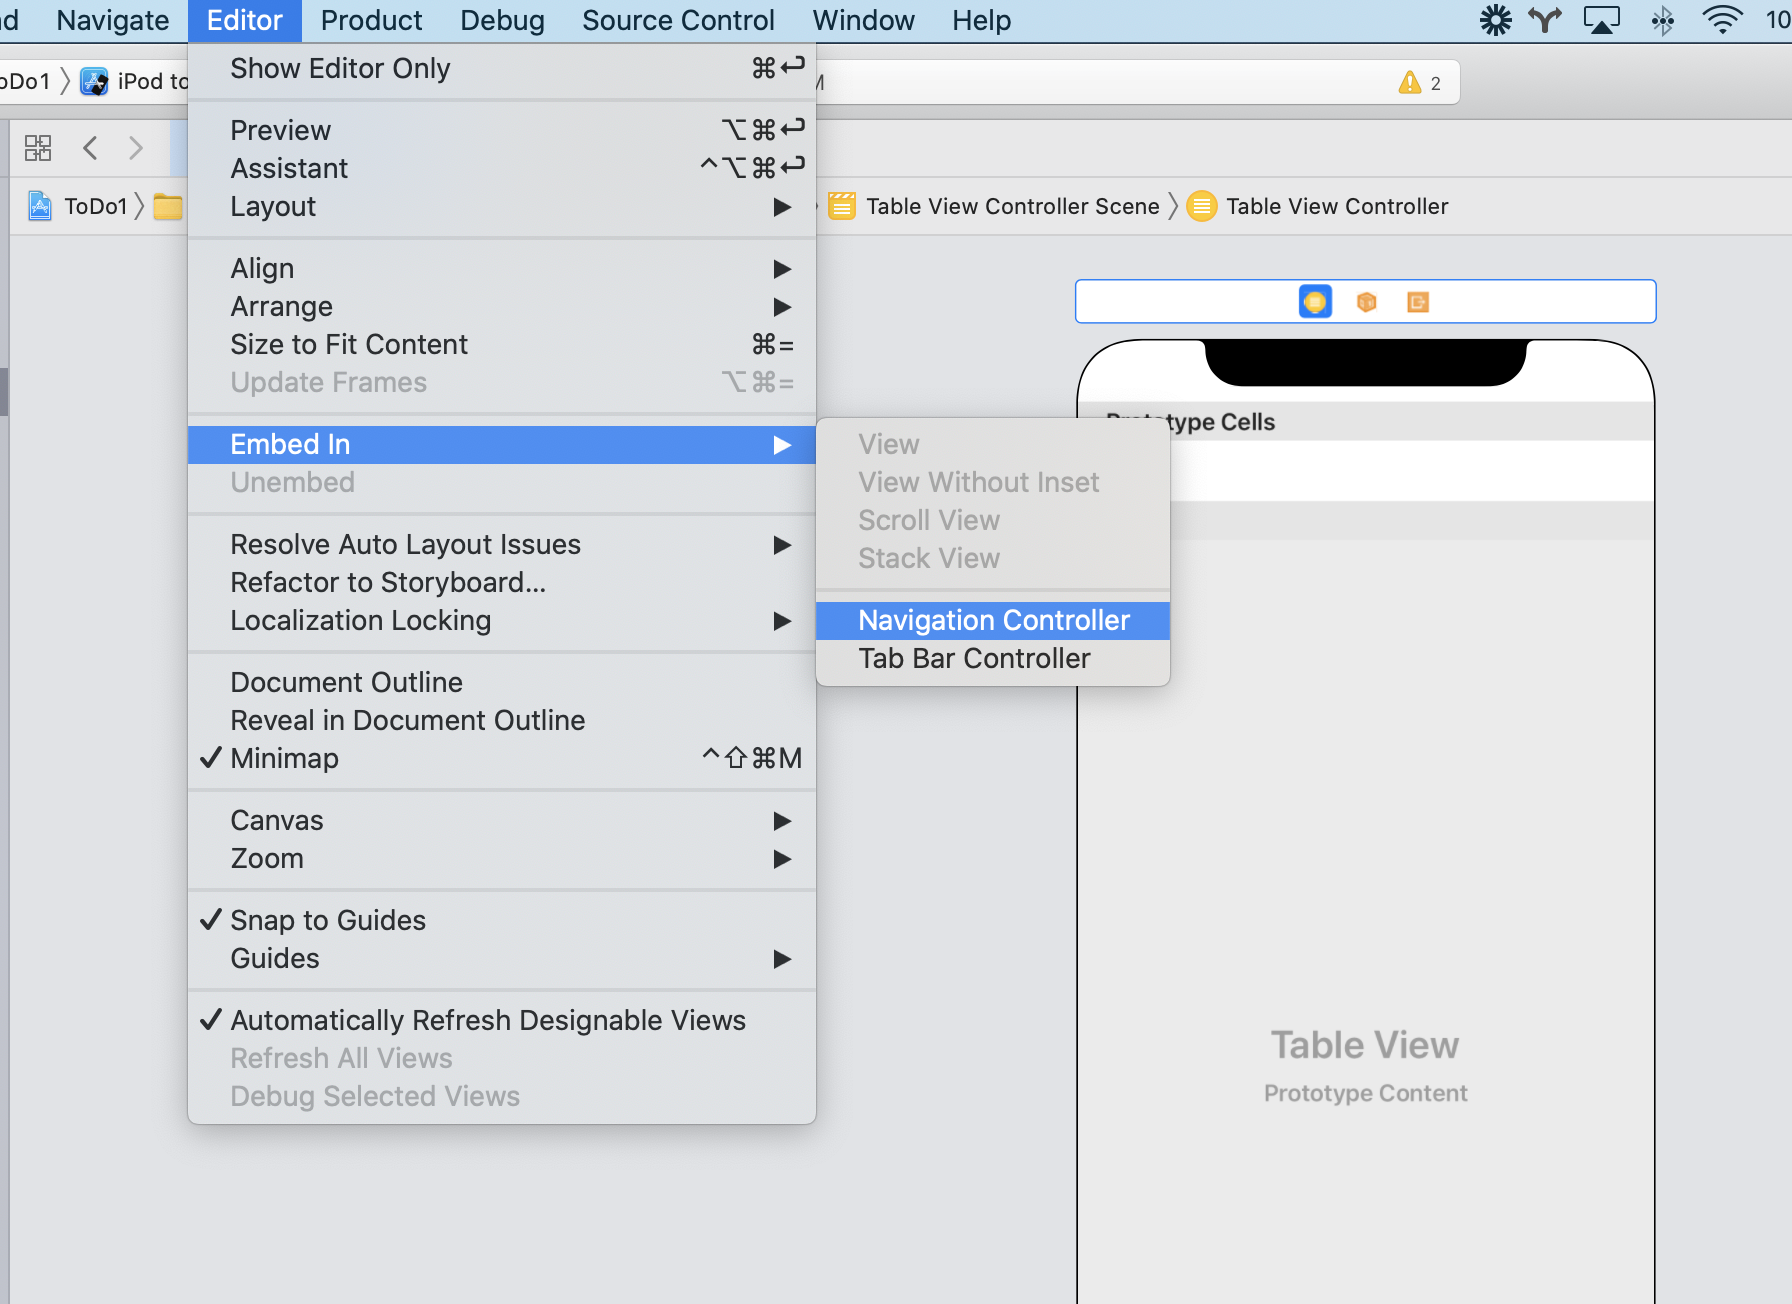
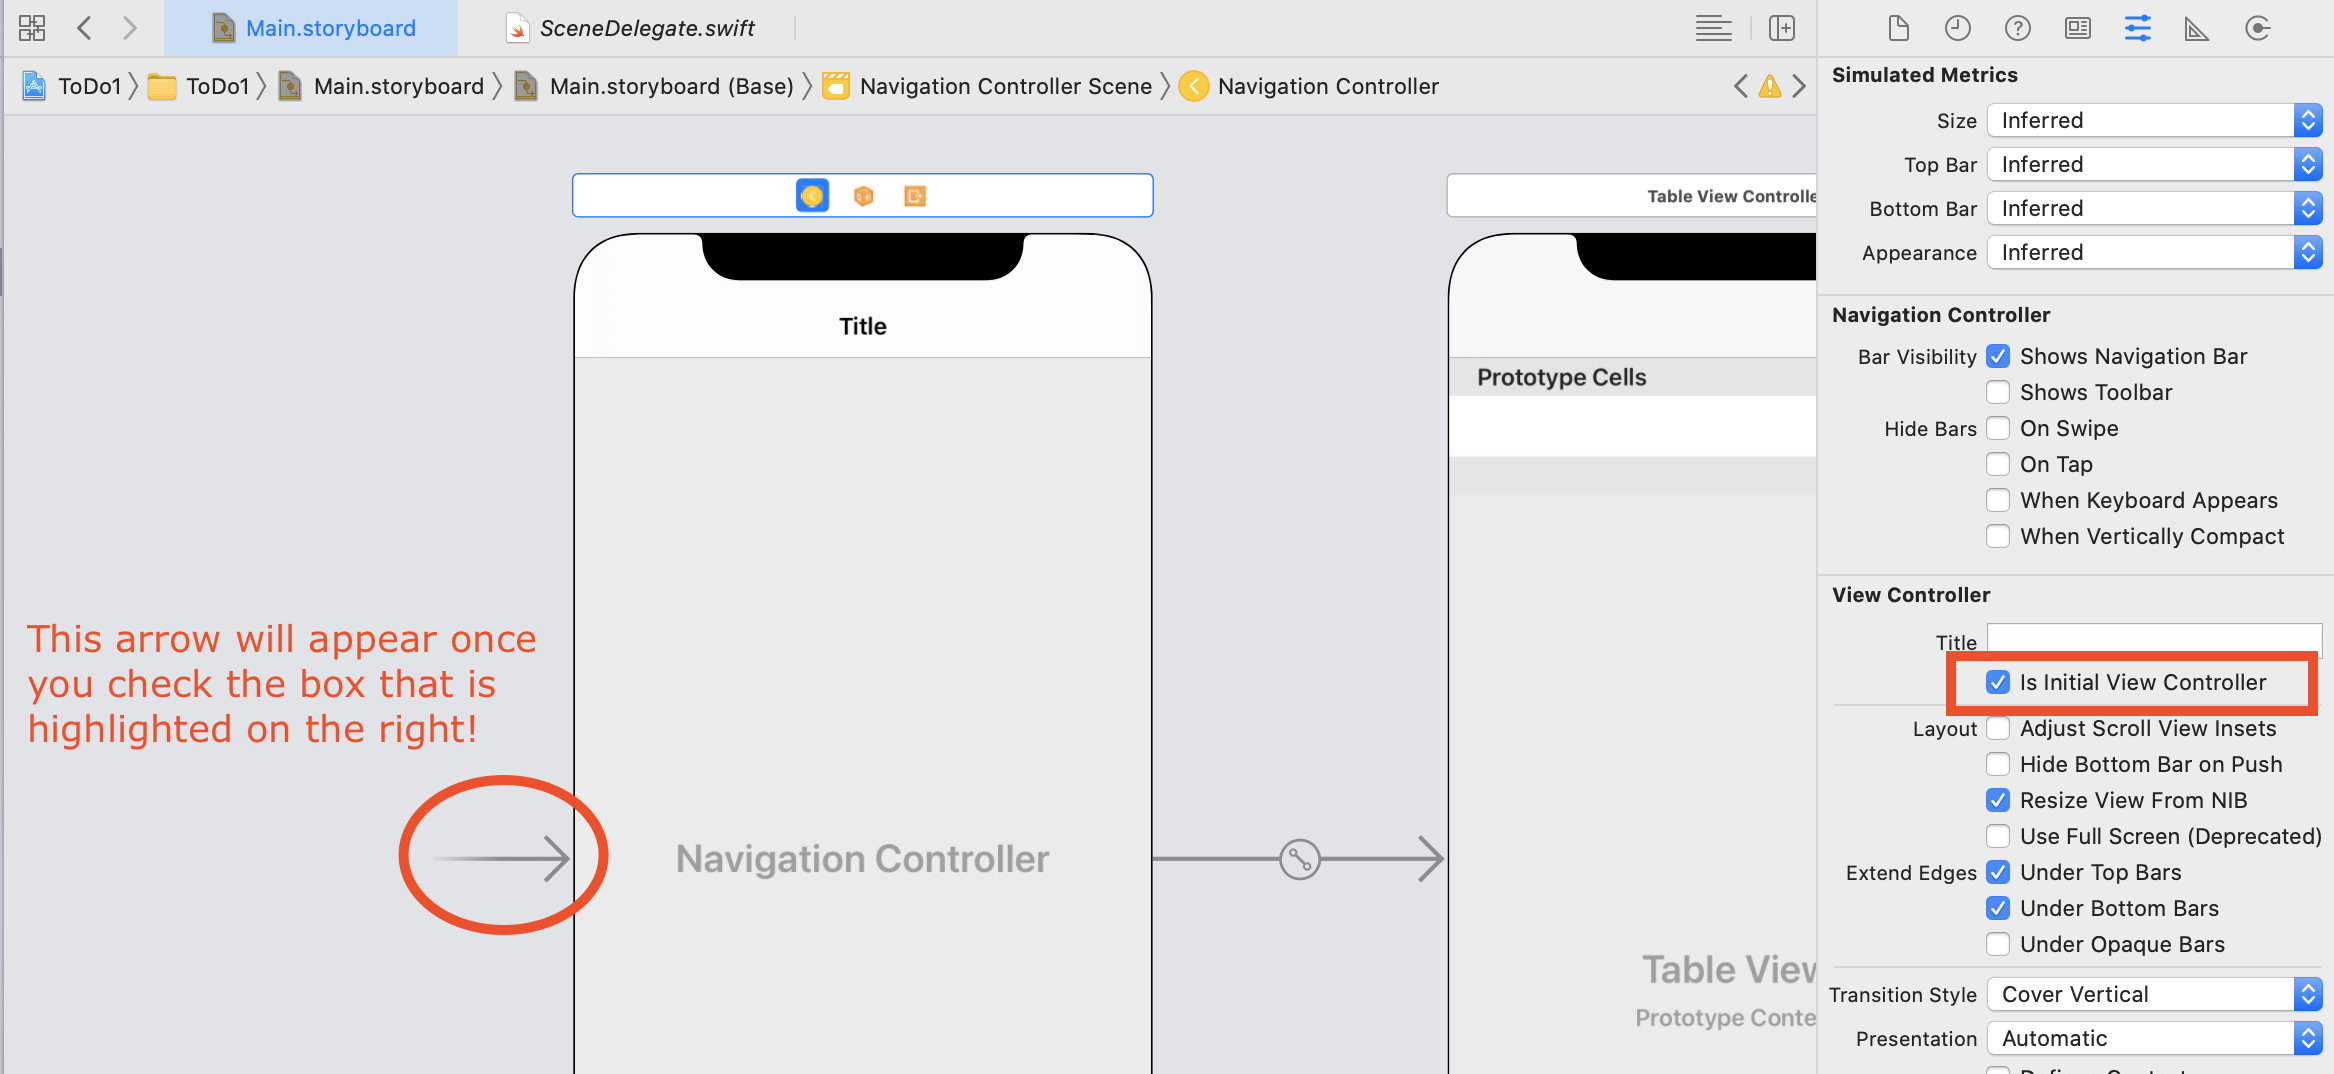
This should have added a Navigation Controller to the Storyboard and added a Navigation Item to our Table View Controller. We now want to make sure that this is our point of entry for our ToDo List application.
- With the Navigation Controller selected, make sure
Is Initial View Controlleris checked in the Attributes Inspector
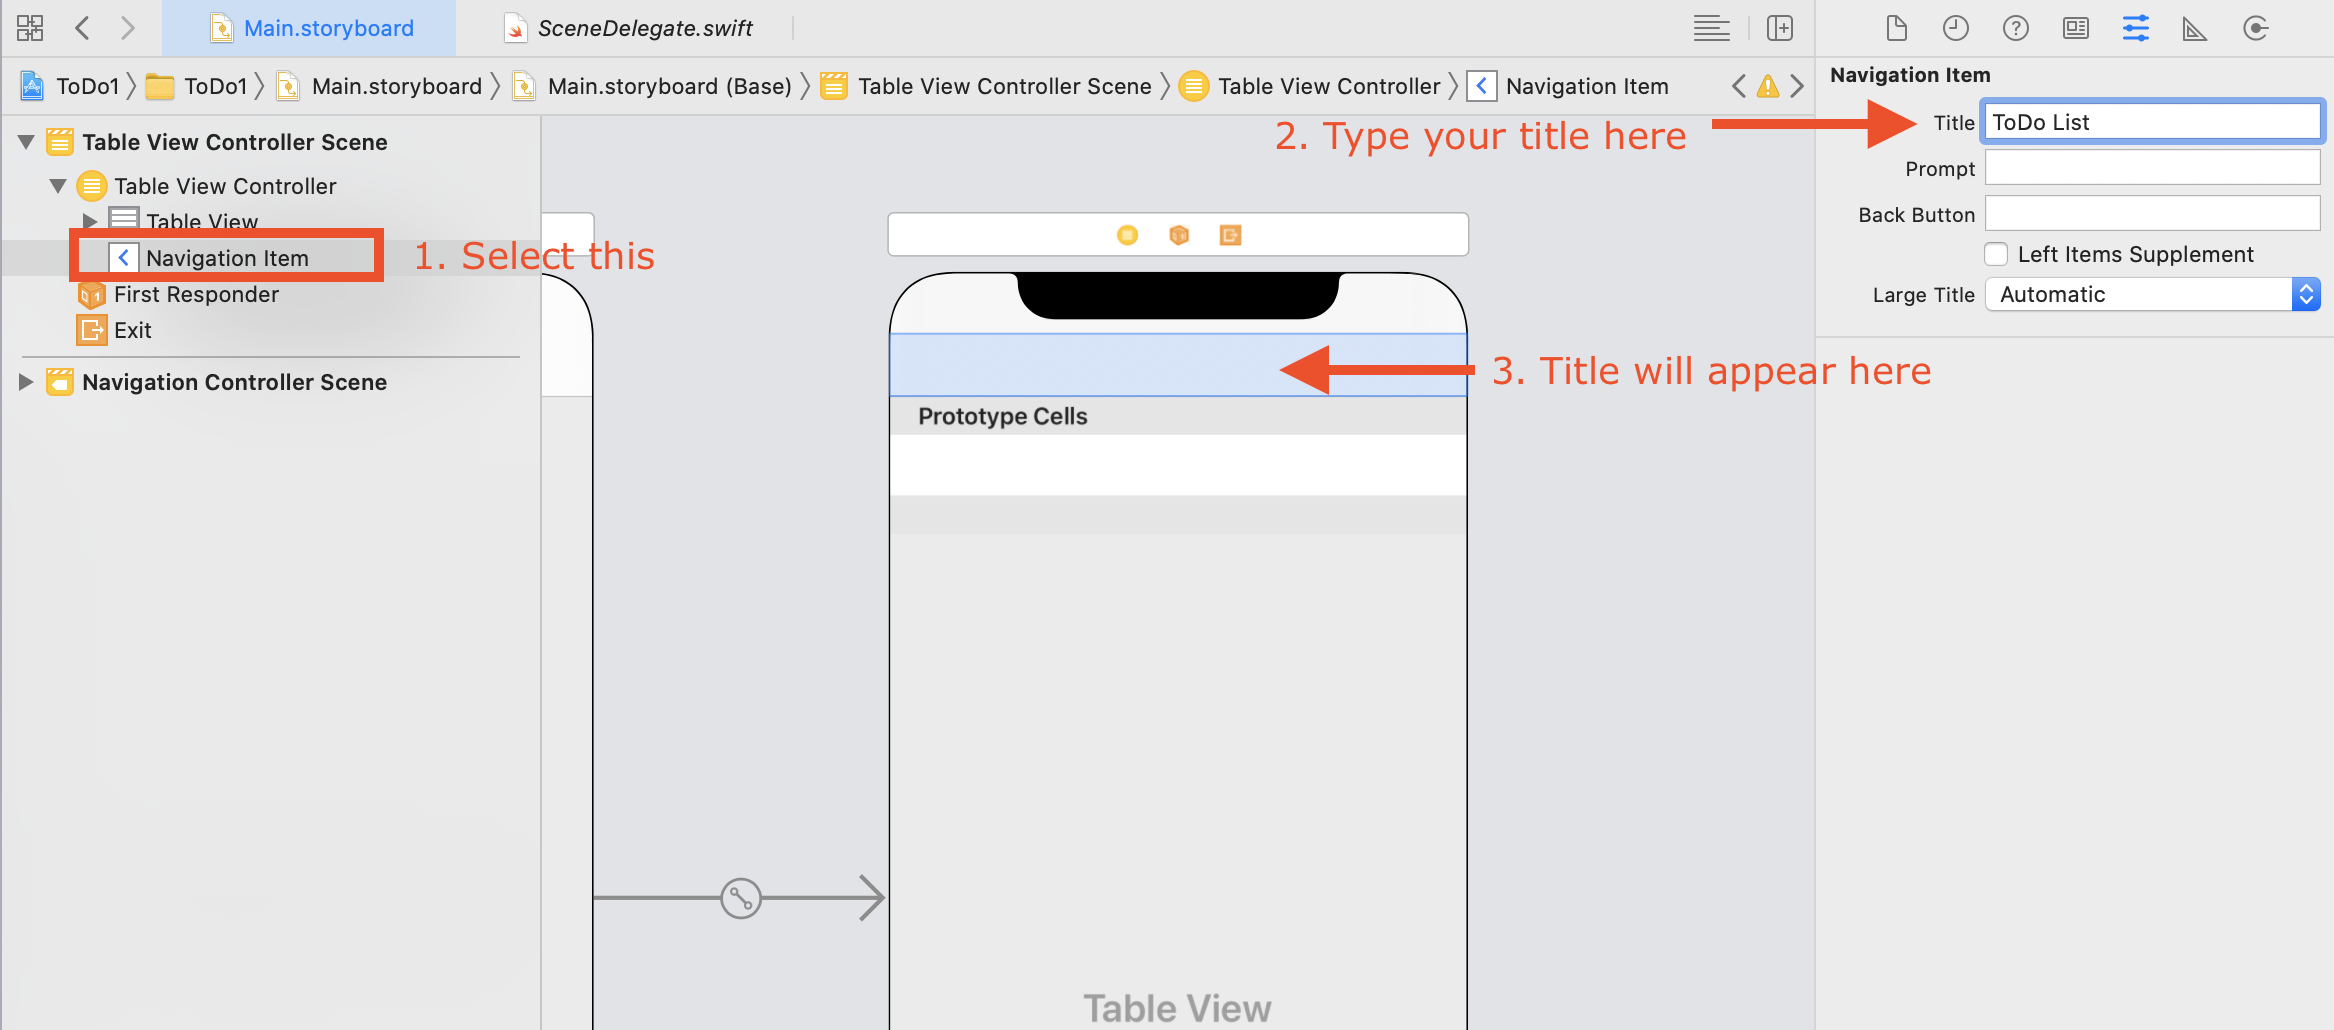
If we select the Navigation Item in the Table View Controller, we can now add a Title to our app (ToDo List or whatever you prefer).
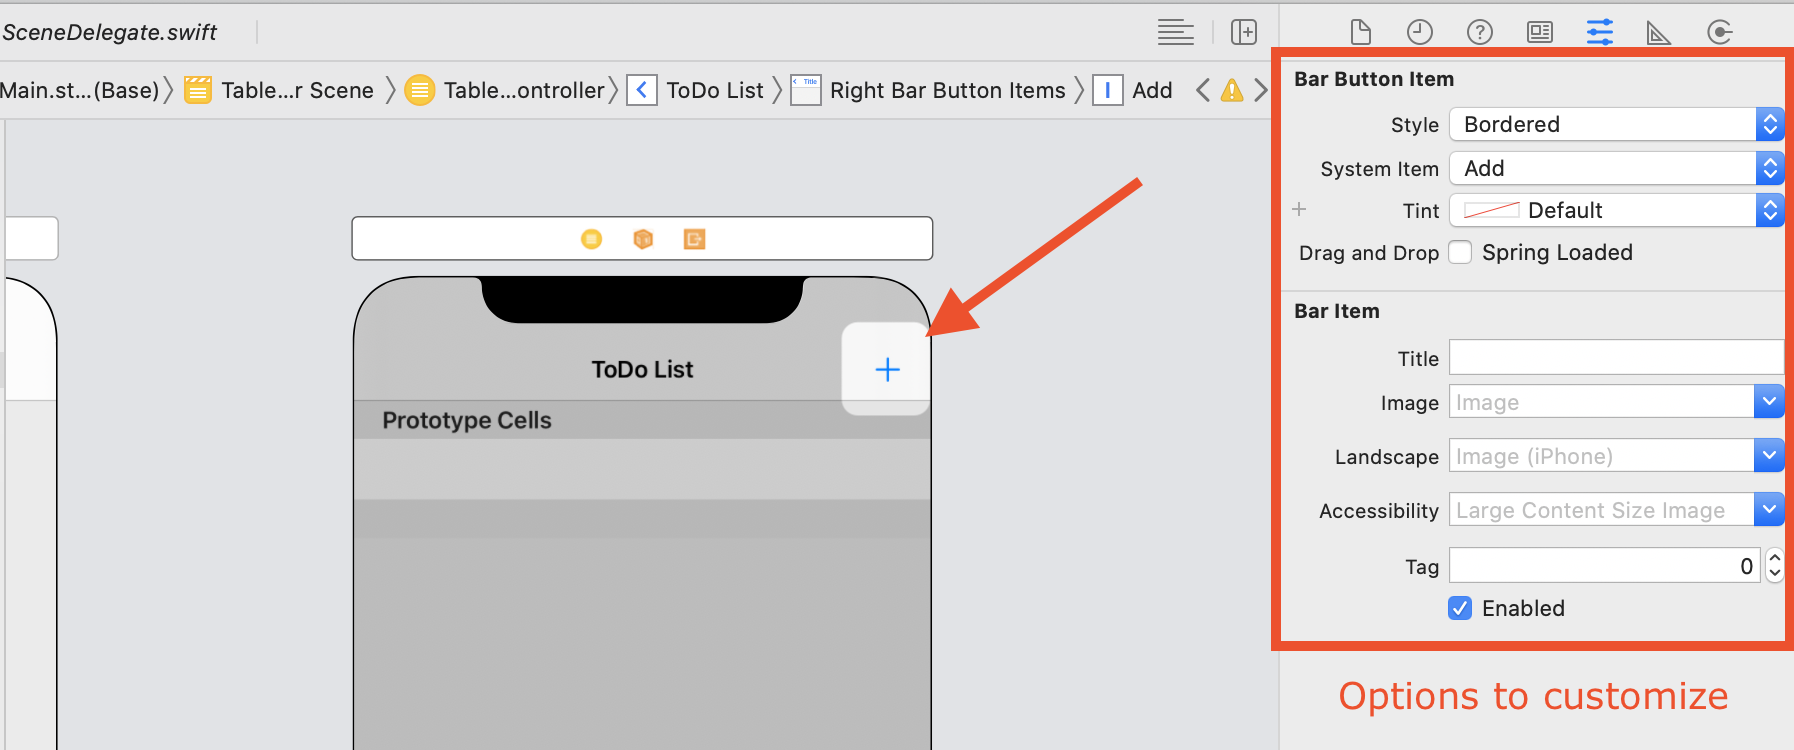
We now want to use the Object Library to add a Bar Button Item that will take the user to another View, where they can add a ToDo. You can customize this however you like!
Great! Let’s connect this Table View to some code!
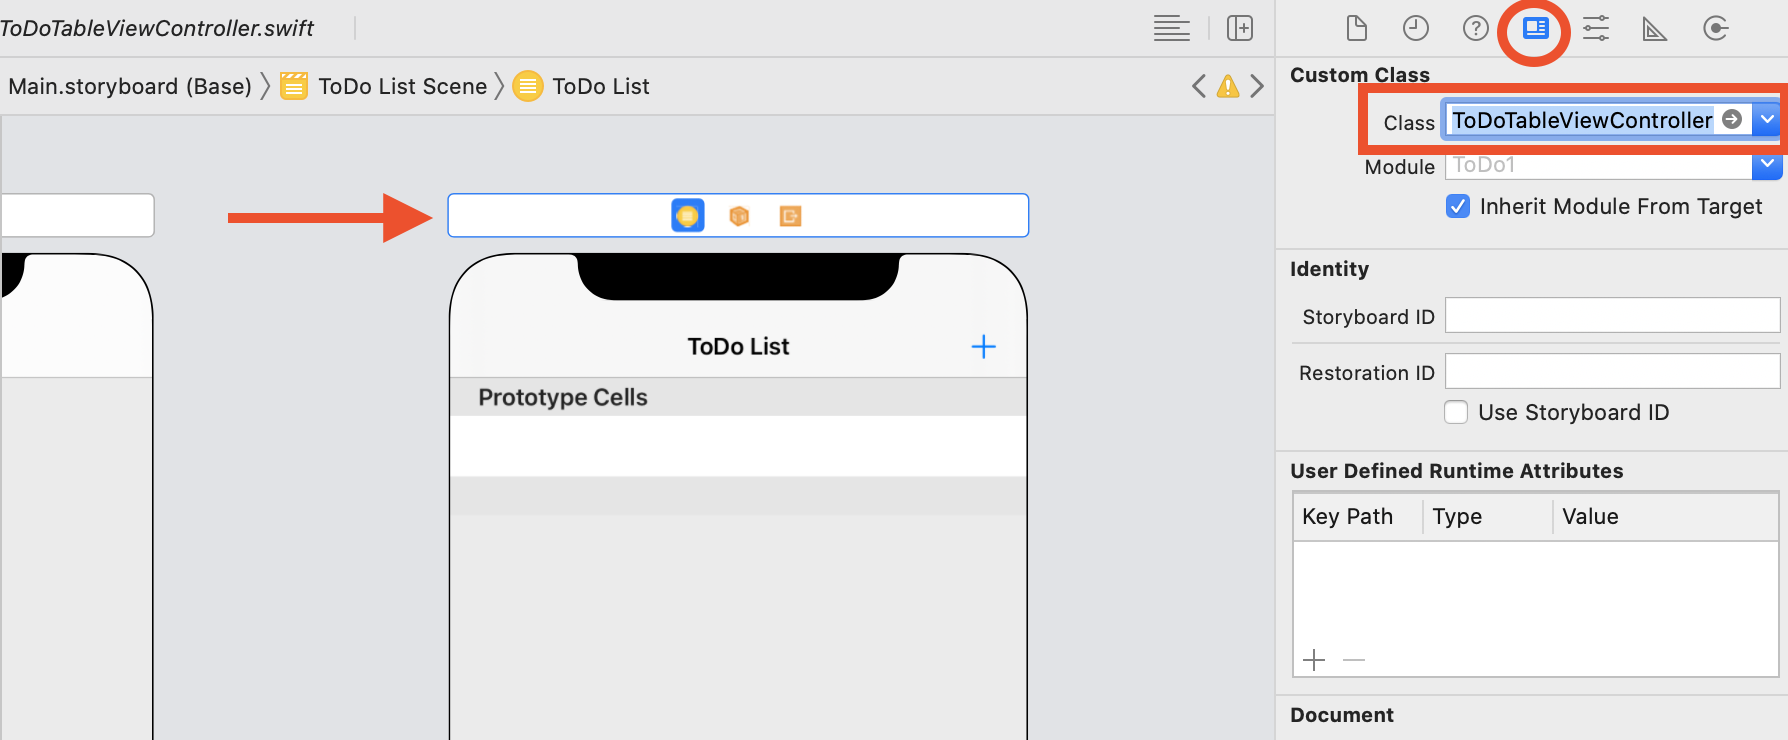
- Create a ToDoTableViewController file (File -> New -> File… -> Cocoa Touch Class -> Next).
Don’t forget to make this a subclass of UITableViewController and connect it to the TableViewController on your storyboard! This tutorial named it ToDoTableViewController.
Create a Custom ToDo class
- Create a new file (File ➡ New ➡ File… ➡ Swift File ➡ Next) and name it
ToDo(this will create a ToDo.swift file in our project) - In that new file, delete
import Foundationand addimport UIKit - Create a ToDo class that has 2 properties…
nameandimportant- if you need a refresher on how to create a class and add properties, take a look back at this lesson
It probably makes sense to initialize name to an empty string and important to the boolean false. And that’s all we need to do for our ToDo class!
Create Some Static ToDos
- Back in our
ToDoTableViewController, we need to make a function that will create ToDos and return an array of ToDos (we’ll hard-code this for now and replace it a little later when we hook up CoreData)- The code below should live inside of the
ToDoTableViewControllerclass, but outside of any of the existing functions. A great place is right below theviewDidLoadfunction. Be careful with the curly braces!
- The code below should live inside of the
func createToDos() -> [ToDo] {

  let swift = ToDo()
  swift.name = "Learn Swift"
  swift.important = true

  let dog = ToDo()
  dog.name = "Walk the Dog"
  // important is set to false by default

  return [swift, dog]
}
- We also need to create a toDos property on our
ToDoTableViewControllerclass (above ourviewDidLoadfunction)
var toDos : [ToDo] = []
- Inside
func viewDidLoad(), delete all the commented out code and reassign toDos to our createToDos function (now toDos will be the array of toDos we returned from the function)
override func viewDidLoad() {
  super.viewDidLoad()

  toDos = createToDos()
}
Let’s clean this file up a little more. You can delete all the other functions in this file except the tableView function with numberOfRowsInSection, the tableView function with cellForRowAt, and the last prepare function that has to do with segue navigation (you can leave this commented out for now).
- In the
tableViewfunction with the argumentnumberOfRowsInSection, we want to returntoDos.count
override func tableView(_ tableView: UITableView, numberOfRowsInSection section: Int) -> Int {
  return toDos.count
}
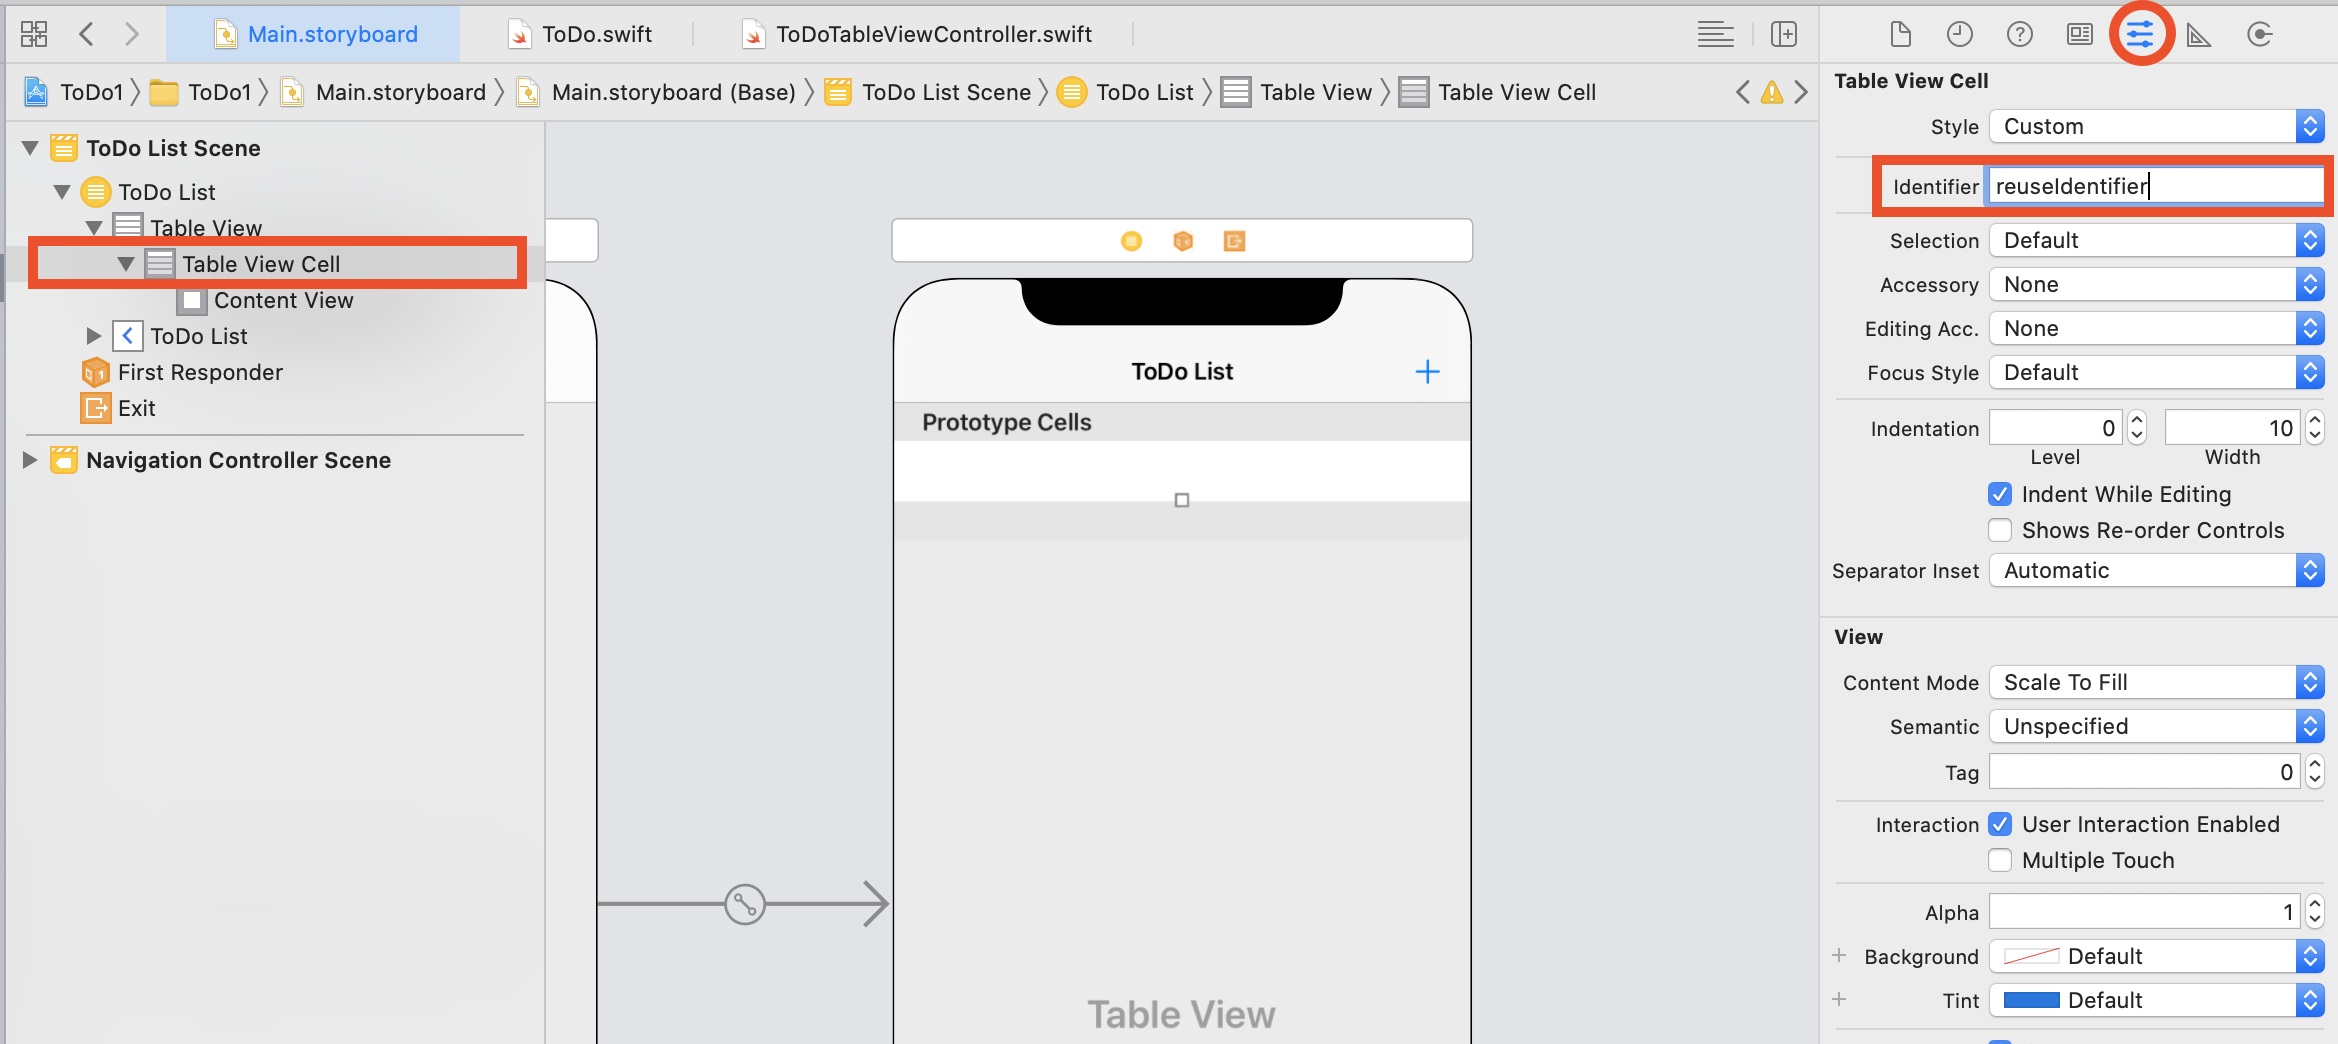
- Uncomment the
tableViewfunction with the argument ofcellForRowAt. Inside of that function, we want to copy the string reuseIdentifier - Now go back to the Storyboard and click right under Prototype Cells to highlight the Table View Cell
- In the Attributes Inspector, paste reuseIdentifier into the
Identifierfield
- Return to the
ToDoTableViewController. Inside thattableViewfunction we were just working on, we need to access a single toDo with the following code:
override func tableView(_ tableView: UITableView, cellForRowAt indexPath: IndexPath) -> UITableViewCell {
  let cell = tableView.dequeueReusableCell(withIdentifier: "reuseIdentifier", for: indexPath)

  let toDo = toDos[indexPath.row]

  return cell
}
- Now let’s add some code to get our toDos to show up and to indicate if the toDo has been marked important
override func tableView(_ tableView: UITableView, cellForRowAt indexPath: IndexPath) -> UITableViewCell {
  let cell = tableView.dequeueReusableCell(withIdentifier: "reuseIdentifier", for: indexPath)

  let toDo = toDos[indexPath.row]

  if toDo.important {
    cell.textLabel?.text = "❗️" + toDo.name
  } else {
    cell.textLabel?.text = toDo.name
  }

  return cell
}
Whoohoo! You should now be able see our hard-coded toDos in the Table View when you run the application in the simulator!
If your debug area pops open with a message when you run the simulator, but the app works as expected, that is ok and you can ignore the message! If the app does not work as expected, the message in that debug area may be helpful in troubleshooting.
Commit Your Work
From the top nav, select “Source Control,” then “Commit.” Follow the steps outlined in the GitHub lesson to commit your work! Your commit message should be something like “Complete Iteration 0.”
Let’s keep going! Move on to Iteration 1